Deploying Web App and Web API in a Shared Container App Environment
This architecture consists of a Container App Environment hosting two distinct Container Apps
Azure Container Apps is a serverless platform that simplifies the deployment of containerized applications. It helps reduce infrastructure management and costs by eliminating the need to handle server configuration, container orchestration, and deployment details. Container Apps automatically provides the necessary, up-to-date server resources to ensure your applications remain stable and secure.
To learn more, visit the official documentation: Azure Container Apps Overview
Overview
In this tutorial, we’ll walk you through the process of getting started with Azure Container Apps. You’ll create a public-facing frontend application that connects to a private web api, which then queries and inserts data into a SQL Server database. The entire setup will be fully automated using Azure Bicep.
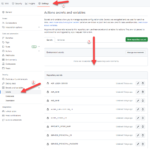
Additionally, we’ll integrate Azure Application Insights and Azure Key Vault to securely store and retrieve secrets such as:
-
acr-password-shared-key -
acr-username-shared-key -
appinsights-connectionstring -
appinsights-instrumentationkey -
law-shared-key -
sqlserver-connectionstring
Deploy Infrastructure
This guide explains how to deploy Azure infrastructure for Container Apps using PowerShell and Bicep.
## Prerequisites

- Azure CLI and Azure PowerShell must be installed.
- You must be signed in to your Azure account (`az login`).
- Bicep templates (`main.bicep` and `main.bicepparam`) should be available in the `bicep/` folder.
Step 1: Set the Azure Subscription
Retrieve the current subscription ID and set it as the active subscription:
$subscriptionId = (Get-AzContext).Subscription.Id
az account set --subscription $subscriptionId
Step 2: Create a Resource Group
Define a name for the resource group and create it in the francecentral region:
$resourceGroupName = "RG-CONTAINER-APPS"
New-AzResourceGroup -Name $resourceGroupName -Location "francecentral"
Step 3: Deploy the Bicep Template
Deploy the infrastructure using your Bicep file and parameters:
New-AzResourceGroupDeployment `
  -Name "container-apps-001" `
  -ResourceGroupName $resourceGroupName `
  -TemplateFile bicep/main.bicep `
  -TemplateParameterFile bicep/main.bicepparam `
  -DeploymentDebugLogLevel All
Parameters Explained
-Name: Name of the deployment.-ResourceGroupName: Name of the resource group to deploy to.-TemplateFile: Path to your Bicep template.-TemplateParameterFile: Path to your Bicep parameters file.-DeploymentDebugLogLevel All: Enables detailed logging for troubleshooting.
Build and Deploy Apps to Azure Container Registry
This section explains how to build Docker images for your applications and push them to an Azure Container Registry (ACR).
Step 1: Set the ACR Name and Login
Set your ACR name and authenticate Docker to push images:
$acrName = "acrdatasynchro"
az acr login --name $acrName
Step 2: Build and Push the Web API Image
Build the Docker image for the WeatherForecast.WebApi app and push it to Azure Container Registry (ACR):
docker build -t "$acrName.azurecr.io/weatherforecast-web-api:latest" `
  .\src\WeatherForecastApp `
  -f .\src\WeatherForecastApp\WeatherForecast.WebApi\Dockerfile `
  --no-cache

docker push "$acrName.azurecr.io/weatherforecast-web-api:latest"
Step 3: Build and Push the Web App Image
Build the Docker image for the WeatherForecast.WebApp and push it to Azure Container Registry (ACR):
docker build -t "$acrName.azurecr.io/weatherforecast-web-app:latest" `
  .\src\WeatherForecastApp `
  -f .\src\WeatherForecastApp\WeatherForecast.WebApp\Dockerfile `
  --no-cache

docker push "$acrName.azurecr.io/weatherforecast-web-app:latest"
deploy web api and front end container apps
Deploy Infrastructure with App Deployment Enabled
In this step, you deploy your Azure resources using a Bicep template and explicitly enable application deployment by setting a custom parameter deployApps to true.
New-AzResourceGroupDeployment `
  -Name "container-apps-001" `
  -ResourceGroupName $resourceGroupName `
  -TemplateFile bicep/main.bicep `
  -TemplateParameterFile bicep/main.bicepparam `
  -deployApps $true `
  -DeploymentDebugLogLevel All
Create SQL Server Tables
The following SQL script is deployed using a Bicep deployment script. It creates two tables: Location and Weather, with a foreign key relationship between them.
Table: Location
Creates a table to store geographical and time zone data for various locations.
CREATE TABLE [dbo].[Location] (
    [Id]                   INT            IDENTITY (1, 1) NOT NULL,
    [Department]           NVARCHAR (100) NULL,
    [DepartmentCode]       INT            NULL,
    [City]                 NVARCHAR (100) NULL,
    [PostalCode]           INT            NULL,
    [Latitude]             FLOAT (53)     NULL,
    [Longitude]            FLOAT (53)     NULL,
    [GenerationTimeMs]     FLOAT (53)     NULL,
    [UtcOffsetSeconds]     INT            NULL,
    [Timezone]             NVARCHAR (50)  NULL,
    [TimezoneAbbreviation] NVARCHAR (10)  NULL,
    [Elevation]            FLOAT (53)     NULL,
    PRIMARY KEY CLUSTERED ([Id] ASC)
);
Table: Weather
Creates a table to store weather-related data, linked to the Location table via a foreign key.
CREATE TABLE [dbo].[Weather] (
    [Id]            INT           IDENTITY (1, 1) NOT NULL,
    [LocationId]    INT           NULL,
    [Time]          NVARCHAR (50) NULL,
    [Interval]      INT           NULL,
    [Temperature]   FLOAT (53)    NULL,
    [Windspeed]     FLOAT (53)    NULL,
    [Winddirection] INT           NULL,
    [IsDay]         INT           NULL,
    [Weathercode]   INT           NULL,
    PRIMARY KEY CLUSTERED ([Id] ASC),
    FOREIGN KEY ([LocationId]) REFERENCES [dbo].[Location] ([Id])
);
These tables are typically used to store historical and real-time weather data by location.
Test and View Logs for Azure Container App
This section outlines how to inspect the deployment status and logs of your Azure Container App named dayasync-weatherforecast-api within the resource group RG-CONTAINER-APPS.
1. View Container App Details
Use the following command to display detailed information about the container app:
az containerapp show --name dayasync-weatherforecast-api --resource-group RG-CONTAINER-APPS
2. Check the Current Container Image
Retrieve the image being used by the first container in the app using PowerShell:
az containerapp show `
  --name dayasync-weatherforecast-api `
  --resource-group RG-CONTAINER-APPS `
  --query "properties.template.containers[0].image"
3. List Revisions and Their Status
List all revisions of the container app along with their state and health conditions using PowerShell:
az containerapp revision list `
  --name dayasync-weatherforecast-api `
  --resource-group RG-CONTAINER-APPS `
  --query "[].{Name:name, State:properties.active, Reason:properties.healthState, Conditions:properties.conditions}" `
  --output json
4. Check Provisioning State
Verify the provisioning state of the container app to ensure it has been deployed successfully:
az containerapp show `
  --name dayasync-weatherforecast-api `
  --resource-group RG-CONTAINER-APPS `
  --query "properties.provisioningState"
These commands help with monitoring, troubleshooting, and validating the deployment of your Azure Container App.
source code
Feel free to play around with the code by checking out the GitHub repo linked below.
https://github.com/azurecorner/azure-container-apps
Related Posts
 Building micro services through Event Driven Architecture part25 : automate workflows to build, test, and deploy code from GitHub using GitHub Actions
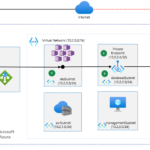 Building micro services through Event Driven Architecture part24 : deploy and manage applications on a Kubernetes cluster using helm charts
- Building micro services through Event Driven Architecture part23 : Azure Kubernetes Services
 Azure-Managed-Identities-Workload-Identity-Federation-Azure-Kubernetes-Services
 Building micro services through Event Driven Architecture part22 : Kubernetes
 Building micro services through Event Driven Architecture part21 : Monitoring and Observability